5.3 Thread-Safe Communication Using Locking, Mutex, and MonitorMixin
So far, we’ve seen how to generate and operate threads. When using multiple resources (file, network, GUI) or time-consuming processes, threading helps you write programs easily. However, if you don’t have a way to communicate and pass objects among threads, then you aren’t able to work with the results of thread operations. In this section, you’ll learn a few ways for threads to communicate with each other safely.
Exclusive Locking
When multiple threads try to operate on the same object at the same time, the object sometimes ends up in a “broken” state.
”Broken” in this case doesn’t mean that its memory space is broken but that the value of an instance variable is changed in an unexpected way. To avoid multiple threads operating at the same time, you need to have some sort of exclusive locking mechanism.
Prohibiting Switching with Thread.exclusive
The simplest way to do exclusive locking is to prohibit threads from switching. Let’s look into this strategy first, using Thread.exclusive. To use Thread.exclusive, you first wrap the operation that you don’t want to switch to another thread into a block of Thread.exclusive.
Thread.exclusive do |
|
# some operation you want to protect |
|
end |
Let’s try an example of prohibiting threads from switching using Thread.exclusive. This example prints out a character twenty times using multiple threads:
% irb --prompt simple |
|
>> def foo(name) |
|
>> 20.times do |
|
?> print name |
|
>> print ' ' |
|
>> end |
|
>> end |
|
=> nil |
|
>> foo('a') |
|
a a a a a a a a a a a a a a a a a a a a => 20 |
Let’s call foo using multiple threads.
>> def test1 |
|
>> t1 = Thread.new { foo('a') } |
|
>> t2 = Thread.new { foo('b') } |
|
>> t1.join |
|
>> t2.join |
|
>> end |
|
=> nil |
|
>> test1 |
|
ab ab a ba ba ba ba ba ba ba ba ba ba ba ba b ab ab ab ab ab |
|
=> #<Thread:0x2ac2b9ec dead> |
You should see that a and b (and whitespace) are mixed randomly. This is because the t1 and t2 threads switch while running foo.
Let’s rewrite this using Thread.exclusive.
>> def test2 |
|
>> t1 = Thread.new { Thread.exclusive { foo('a') } } |
|
>> t2 = Thread.new { Thread.exclusive { foo('b') } } |
|
>> t1.join |
|
>> t2.join |
|
>> end |
|
=> nil |
|
>> test2 |
|
a a a a a a a a a a a a a a a a a a a a b b b b b b b b b b b b b b b b b b b b |
|
=> #<Thread:0x2ac0df8c dead> |
With Thread.exclusive { foo(’a’) }, foo(’a’) doesn’t switch while executing, so it will print out a without mixing with b.
Thread has critical and critical= class methods to control the state of whether you can switch threading. Setting Thread.critical = true prohibits thread switching. While in this state, execution in the running thread can’t move into another thread. To stop this, you have to set Thread.critical = false. You can check whether thread switching is allowed via Thread.critical. To turn on and off thread switching via Thread.critical, it’s common practice to record the previous value before doing Thread.critical = true and then put it back once the critical section is processed. Thread.exclusive does exactly that. In fact, the only exclusive locking mechanism in Ruby is Thread.critical. All other locking libraries we are going to learn next, such as Mutex and Queue, are built on top of Thread.critical.
Locking Single Resources with Mutex
Thread.exclusive halts all threads except the current thread. This isn’t natural and also a bit of a waste of resource usage. It would be more efficient if you could acquire an exclusive lock only on the resource you are accessing and leave other threads running.
Mutex offers such a mechanism. Mutex is an acronym for mutual exclusion.
A mutex has a lock state. A mutex can be locked by only one thread at a time and can be unlocked only by that thread. While a mutex is locked, any thread that attempts to acquire a lock will block until the mutex is unlocked. (In Ruby 1.8, any thread was able to unlock.)
If a thread is trying to lock while being blocked, then it will block until the lock is unlocked.
Mutex has lock and unlock methods, but you usually don’t use them directly. Instead, you use the synchronize method, which wraps these methods.
Let’s experiment with using Mutex with dRuby. First fire up irb in two terminals. Terminal 1 acts as a server with a Mutex object, and terminal 2 acts as a client.
# [Terminal 1] |
|
% irb --prompt simple -r drb/drb |
|
>> m = Mutex.new |
|
>> DRb.start_service('druby://localhost:12345', m) |
|
>> m.locked? |
|
=> false |
# [Terminal 2] |
|
% irb --prompt simple -r drb/drb |
|
>> DRb.start_service |
|
>> m = DRbObject.new_with_uri('druby://localhost:12345') |
|
>> m.locked? |
|
=> false |
Each variable of irb refers to the Mutex of terminal 1. You can use locked? to check their locking status. They should return false in both terminals. Let’s try to acquire a lock at terminal 1 and then try to lock at terminal 2.
# [Terminal 1] |
|
>> m.lock |
|
=> #<Mutex:0x2ad9bcc0 @locked=true, @waiting=[]> |
|
>> m.locked? |
|
=> true |
# [Terminal 2] |
|
>> m.lock |
Did you notice that there is no prompt coming back at terminal 2? This is because we acquired a Mutex lock at terminal 1, so the next lock is blocked by the previous lock. Let’s try to unlock at terminal 1 and check the lock status.
# [Terminal 1] |
|
>> m.unlock |
|
=> #<Mutex:0x2ad9bcc0 @locked=true, @waiting=[]> |
|
>> m.locked? |
|
=> true |
locked? still returns true. This is because the previous locks at terminal 2 were unlocked, and terminal 2 acquired a new lock. Did you see a prompt from terminal 2?
# [Terminal 2] |
|
>> m.lock # <= Statement you typed earlier |
|
=> #<DRb::DRbObject:0x2ad9bcc0 @ref=nil, @uri="druby://localhost:12345"> |
|
>> m.locked? |
|
=> true |
Now let’s try try_lock. This should return false immediately instead of blocking your terminal.
# [Terminal 1] |
|
>> m.try_lock |
|
=> false |
Right now, a lock is held at terminal 2. Can we unlock from terminal 1?
# [Terminal 1] |
|
>> m.unlock |
|
ThreadError: Attempt to unlock a mutex which is locked by another thread |
|
from (irb):9:in `unlock' |
|
from (irb):9 |
|
from /usr/local/bin/irb19:12:in `<main>' |
In Ruby 1.8, you can unlock it even from the session that didn’t acquire the lock. The behavior of Mutex changed in Ruby 1.9, and now it raises ThreadError.
You have to bear in mind that Mutex is just a gentlemen’s agreement, and it won’t actually protect the resource. It is similar to how a traffic light works. A traffic light tells you when is the right time to cross street, but it will not protect you if a car ignores the traffic light signal.
You may sometimes forget to unlock the resource you locked earlier. To avoid this situation, synchronize provides the “lock -> executing the block -> unlock” sequence within the method so that you can write a critical operation within the synchronize block.
Let’s see this method in action. You’ll need to do this next experiment quickly. Write the sample code in terminal 2 while the code of terminal 1 is still running (it finishes within ten seconds). Let’s enter exactly the same statement into both terminals. (Make sure you unlock the lock you acquired in the previous example at terminal 2 before you start this experiment.)
# [Terminal 1] |
|
>> m.synchronize { puts('lock'); sleep(10); puts('unlock') } |
# [Terminal 2] |
|
>> m.synchronize { puts('lock'); sleep(10); puts('unlock') } |
The following should be the printing order:
(Terminal1) lock |
|
10 sec |
|
(Terminal1) unlock |
|
(Terminal2) lock |
|
10 sec |
|
(Terminal2) unlock |
Next, what will happen if you unlock when it isn’t actually locked?
# [Terminal 1] |
|
>> m.unlock |
|
ThreadError: Attempt to unlock a mutex which is not locked |
|
>> m.locked? |
|
=> false |
Let’s try try_lock again. It should return true because nothing has been locked.
# [Terminal 1] |
|
>> m.try_lock |
|
=> true |
|
>> m.locked? |
|
=> true |
Next, let’s write a simple counter.
| counter0.rb | |
class Counter |
|
def initialize |
|
@value = 0 |
|
end |
|
attr_reader :value |
|
|
|
def up |
|
@value = @value + 1 |
|
end |
|
end |
|
The Counter class implements a basic counter. A value is incremented by one with the up method.
However, this script has a problem.
@value = @value + 1 |
The code first takes a value from @value, adds 1, and then assigns the value back to @value. This will cause trouble if another thread takes the value while one thread is taking the value and assigning the incremented value. The following shows the flow of this example. This explains the situation when the value is incremented by 1 even when the up method is called by two different threads.
-
Initial value:
@valueis 5. -
Thread A takes 5 from
@value. -
Thread B takes 5 from
@value. -
Thread A assigns the calculated result (6) into
@value. -
Thread B assigns the calculated result (6) into
@value. -
The result of
@valuebecomes 6, even though the expected value is 7.
The problem is that multiple threads try to operate @value at the same time. You need a way to restrict the operation of @value to be allowed by only one thread.
When you want to manage shared resources, you should prepare Mutex to protect the resource.
| counter1.rb | |
class Counter |
|
def initialize |
|
@mutex = Mutex.new |
|
@value = 0 |
|
end |
|
attr_reader :value |
|
|
|
def up |
|
@mutex.synchronize do |
|
@value = @value + 1 |
|
end |
|
end |
|
end |
|
counter1.rb is a modified version of counter0.rb where it adds a Mutex exclusive lock. When one thread is updating @value, Mutex prevents other threads from updating @value.
def up |
|
@mutex.synchronize do |
|
@value = @value + 1 |
|
end |
|
end |
The preceding Mutex#synchronize takes care of the following:
-
Locking by
Mutex(lock) -
Executing a given block (
yield) -
Unlocking
Mutex(unlock)
unlock happens inside the ensure block so that the unlocking operation will happen even if an error happens inside the block.
The up method locks Mutex, executes (@value = @value + 1), and then unlocks the lock.
Because only one thread can acquire a Mutex lock, it guarantees that multiple threads won’t be able to control @value.
The Reminder program that we wrote in Section 1.2, Building the Reminder Application is actually not multithread safe. Let’s review reminder0.rb and modify the dangerous part.
| reminder01.rb | |
class Reminder |
|
def initialize |
|
@item = {} |
|
@serial = 0 |
|
end |
|
def [](key) |
|
@item[key] |
|
end |
|
def add(str) |
|
@serial += 1 |
|
@item[@serial] = str |
|
@serial |
|
end |
|
def delete(key) |
|
@item.delete(key) |
|
end |
|
def to_a |
|
@item.keys.sort.collect do |k| |
|
[k, @item[k]] |
|
end |
|
end |
|
end |
|
add method increments a key at @serial, but @serial isn’t multithread safe, just as you saw in the up method in the Counter class.
The to_a method generates an array from @item, which could also return some data that another thread removed.
Let’s protect each method one at a time. First we generate a Mutex object in initialize and keep it in a @mutex variable.
def initialize |
|
@mutex = Mutex.new |
|
@item = {} |
|
@serial = 0 |
|
end |
The [](key) method only reads a value and doesn’t need to acquire exclusive locks, so we’ll leave it as is. (Here’s a question for you to ponder on your own: is this really true? If Hash#[](key) is multithread safe, then it should be OK—but what if someone redefines the method?)
The add method adds an item, but incrementing a value in the @serial part could become a problem, so let’s protect the entire add method using Mutex. This is easy.
def add(str) |
|
@mutex.synchronize do |
|
@serial += 1 |
|
@item[@serial] = str |
|
@serial |
|
end |
|
end |
The smaller the area Mutex protects, the more areas multiple threads could run at the same time. You can say that it’s more efficient if you can minimize the code protected by synchronize. So, let’s think about which area you really need to protect for the add method. The following shows the flow of the add method:
-
Generate a key for the new item.
-
Register the item to hash.
-
Return the key.
If we assume that the []=(key, value) method is multithread safe, then we only need to protect the key generation part. This is because if the key generation is atomic, the key used is unique, and assigning a value is safe. The following is the modified add method using this tactic. We separated the key generation part as a serial method, and we protect only this part via Mutex. You may even want to make the serial method a private method.
def serial |
|
@mutex.synchronize do |
|
@serial += 1 |
|
return @serial |
|
end |
|
end |
|
|
|
def add(str) |
|
key = serial |
|
@item[key] = str |
|
key |
|
end |
If the lock method is called while Mutex is locked, the thread that called the lock method will be locked until the first lock is unlocked. If both the serial method and the add method call @mutex.synchronize, this will cause a deadlock because each method tries to lock the other.
def serial |
|
@mutex.synchronize do |
|
@serial += 1 |
|
return @serial |
|
end |
|
end |
|
|
|
def add(str) |
|
@mutex.synchronize do |
|
key = serial |
|
@item[key] = str |
|
return key |
|
end |
|
end |
This is the deadlock scenario (see Figure 26, Deadlock caused by nested synchronize). First the synchronize method inside add will acquire a Mutex lock. Then it calls the serial method. The synchronize method inside the serial method tries to acquire the Mutex lock again, so it will cause a deadlock.
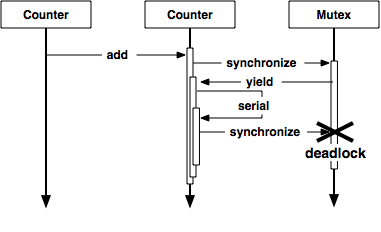
Figure 26. Deadlock caused by nested
synchronize
You have to be careful not to cause a deadlock when using Mutex. You’ll find out more about MonitorMixin in Monitoring with MonitorMixin, which allows you to avoid these problems.
I’ve already mentioned that the Mutex#synchronize method is a wrapper of Thread.critical. The serial method does only simple operations, but is it worth using the synchronize method of Mutex? Can we just use Thread.exclusive?
def serial |
|
Thread.exclusive do |
|
@serial += 1 |
|
return @serial |
|
end |
|
end |
This serial method is rewritten using Thread.exclusive. This version of serial works fine, and it won’t sacrifice the ability to run concurrently. How about readability? Thread.exclusive clearly means that it executes exclusively, but it looks a bit arbitrary to use Thread.exclusive when other methods inside the Counter class already use Mutex. It’s better to code in a consistent way, rather than using an arbitrary method in exchange for a slight performance gain.
The following script is a modified version of the delete and to_a methods with Mutex. These two methods protect their entire methods.
def delete(key) |
|
@mutex.synchronize do |
|
@item.delete(key) |
|
end |
|
end |
|
|
|
def to_a |
|
@mutex.synchronize do |
|
@item.keys.sort.collect do |k| |
|
[k, @item[k]] |
|
end |
|
end |
|
end |
Monitoring with MonitorMixin
MonitorMixin is one of my favorite libraries. It is an advanced thread coordination mechanism that uses ConditionVariable (a status variable), similar to Mutex. This is very good for writing complex synchronization logic that’s hard to write using a simple exclusive locking mechanism. The MonitorMixin#synchronize also lets you write a nested lock, so you can use it as a more convenient version of Mutex without using a status variable.
First we’ll see how this works as a convenient version of Mutex, and then we’ll use ConditionVariable.
Using Monitor
To use Monitor, you first need to require monitor. It provides a mixin module called MonitorMixin and an independent class called Monitor.
Let’s use MonitorMixin to make Reminder multithread safe, as we did with Mutex. Let’s load MonitorMixin with require ’monitor’.
require 'monitor' |
|
|
|
class Reminder |
|
include MonitorMixin |
|
def initialize |
|
super |
|
@item = {} |
|
@serial = 0 |
|
end |
In the preceding code, MonitorMixin is included inside Reminder. To initialize MonitorMixin, call the super method inside the initialize method of Reminder.
Now let’s add a synchronize method inside each method. Because MonitorMixin is already included, we’ll call its own method, unlike @mutex.synchronize of the Mutex version.
def add(str) |
|
synchronize do |
|
@serial += 1 |
|
@item[@serial] = str |
|
@serial |
|
end |
|
end |
|
|
|
def delete(key) |
|
synchronize do |
|
@item.delete(key) |
|
end |
|
end |
|
|
|
def to_a |
|
synchronize do |
|
@item.keys.sort.collect do |k| |
|
[k, @item[k]] |
|
end |
|
end |
|
end |
Because the synchronize method of MonitorMixin can handle nested locks, you don’t have to worry about having a deadlock, unlike in the Mutex version.
def serial |
|
synchronize do |
|
@serial += 1 |
|
return @serial |
|
end |
|
end |
|
|
|
def add(str) |
|
synchronize do |
|
key = serial |
|
@item[key] = str |
|
return key |
|
end |
|
end |
It may look a bit thoughtless, but you can systematically wrap any method that needs thread safety with the synchronize method because MonitorMixin#synchronize handles a nested lock. It’s similar to the synchronized keyword in Java. It can be a good tactic to first put synchronize into every method and investigate only the part that’s causing a bottleneck.
Monitor has two methods—mon_enter and mon_exit—for locking and unlocking. These methods are named in this way with the idea that critical code enters and exits the Monitor class.
% irb --prompt simple |
|
>> require 'drb/drb' |
|
>> require 'monitor' |
|
>> m = Monitor.new |
|
>> DRb.start_service('druby://localhost:12345', m) |
|
>> m.mon_enter |
|
=> 1 |
|
>> m.mon_enter |
|
=> 2 |
|
>> m.mon_exit |
|
=> nil |
|
>> m.mon_exit |
|
=> #<Mutex:0x007fdb7c802528> |
|
>> m.mon_exit |
|
ThreadError: current thread not owner |
|
from /usr/local/lib/ruby/1.9/monitor.rb:249:in `mon_exit' |
|
from (irb):16 |
As you can see, this doesn’t lock mon_enter from the same thread. This also raises a ThreadError exception if there are more mon_exit methods than mon_enter methods.
Let’s experiment with mon_enter using multiple terminals. First, a thread in terminal 1 (the one you started) enters a monitor with the mon_enter method.
>> m.mon_enter |
|
=> 1 |
Now let’s try to synchronize from terminal 2.
% irb --prompt simple |
|
>> require 'drb/drb' |
|
>> DRb.start_service |
|
>> m = DRbObject.new_with_uri('druby://localhost:12345') |
|
>> m.synchronize { puts('hello') } |
It should be blocked because terminal 1 is already in the monitor. The block at terminal 2 should be executed when the thread in terminal 1 exits with the mon_exit command.
>> m.mon_exit |
|
hello |
|
=> nil |
Did you get the prompt back at terminal 2? This means you can enter a monitor from the same thread but not from a different thread when using the synchronize method of Monitor and MonitorMixin.
The next example shows the different behavior between Ruby and dRuby. The nested synchronize doesn’t work properly in dRuby. Let’s try to operate a local object at terminal 1.
>> m.synchronize { m.synchronize { puts('nest') } } |
|
nest |
|
=> nil |
Monitor lets the same thread enter, so this kind of nested synchronize will work without being blocked.
What will happen if we run similar code from terminal 2?
Because m at terminal 2 is referencing Monitor at terminal 1, this is remote method invocation via dRuby. Try exactly the same command from terminal 2.
Ummm, the prompt doesn’t come back. It looks like it’s being blocked. This is because the thread that ran synchronize first and the thread that ran synchronize inside the thread are different, which causes a deadlock at terminal 2.
Let’s try again from terminal 1.
>> m.synchronize { m.synchronize { puts('nest') } } |
This should be stopped, because the first synchronize at terminal 2 has not finished yet.
Let’s stop irb at terminal 2 using Ctrl-C; then type exit to completely quit irb.
# Continued from previous session. |
|
> m.synchronize { m.synchronize { puts('nest') } } |
|
^CIRB::Abort: abort then interrupt!! |
|
from /usr/local/lib/ruby/1.9/drb/drb.rb:566:in `call' |
|
>> exit |
When irb finishes, synchronize at terminal 2 ends, and the thread at terminal 1 starts.
You usually won’t use Monitor in this way, but I wanted to show that the thread that calls the block and the thread that runs the block are different in dRuby.
Using ConditionVariable
Let’s see how to use the condition variable. ConditionVariable is a synchronization mechanism used with Monitor. You can generate the variable using the new_cond method of Monitor. ConditionVariable is used when a thread enters a monitor (when a thread acquires a lock and releases it when certain conditions are met).
In typical usage, an application consists of two roles. One is to wait until certain conditions are met, and another is to notify of state change. Let’s first look at the pseudocode that awaits the state.
def foo |
|
synchronize do |
|
until some_condition() |
|
@cond.wait |
|
end |
|
do_foo() |
|
end |
|
end |
This acquires a lock, waits until a certain condition (some_condition()) is satisfied by running the wait method of the @cond instance, and then returns the lock. The wait method will block until the signal or broadcast method is called. When @cond.wait unblocks the control, a thread will acquire the lock again.
until some_condition() |
|
@cond.wait |
|
end |
|
|
|
while some_condition() |
|
@cond.wait |
|
end |
This is a frequently used idiom to deal with condition variables. ConditionVariable has some utility methods to handle this kind of loop. The following is an extract of the monitor.rb code:
class ConditionVariable |
|
... |
|
def wait_while |
|
while yield |
|
wait |
|
end |
|
end |
|
|
|
def wait_until |
|
until yield |
|
wait |
|
end |
|
end |
|
end |
You use the code like this:
@cond.wait_until { some_condition() } |
Let’s now look at the pseudocode that notifies of the status change.
def bar |
|
synchronize do |
|
do_bar() |
|
@cond.broadcast |
|
end |
|
end |
The signal method restarts only the one waiting thread (wakeup). broadcast restarts all the waiting threads. The restarted threads from these methods try to acquire new locks. Only the thread that manages to acquire the lock can complete wait mode and go back to its operation, so not all the threads that were called by signal or broadcast complete the wait method. It’s also worth mentioning that there is only one thread that runs the monitor.
This pseudocode opens up all threads using broadcast. You should use signal only when you know that there is just one thread to wakeup. For example, if a method that did wakeup was killed before starting its operation, it may cause a deadlock. If you aren’t sure, it’s safe to use broadcast.
Synchronization Example with Rendezvous
Let’s write a simple synchronization mechanism using Monitor. We’ll write a message exchange mechanism called Rendezvous. Here’s the specification (see Figure 27, Rendezvous synchronization):
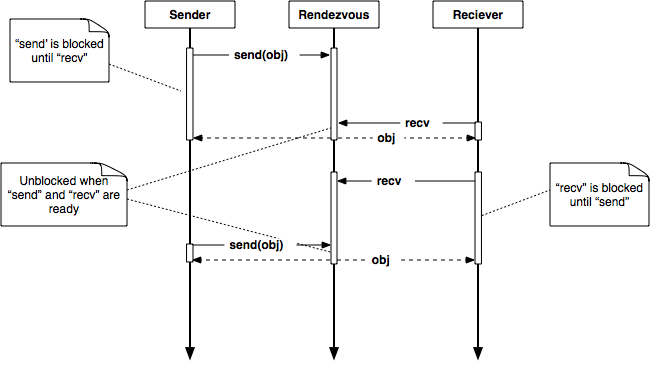
Figure 27. Rendezvous synchronization
-
Rendezvous has two operations,
sendandrecv. -
One thread performs the
sendoperation, and another thread performs therecvoperation. -
When
sendis called, the calling thread will be blocked and wait untilrecvis called. -
When
recvis called first, the calling thread will be blocked and wait untilsendis called. -
If another
sendis called while the previous one is still running, then both get blocked. Ifrecvis called, one of the threads gets unlocked. -
If another
recvis called while the previous one is still running, then both get blocked. Ifrecvis called, one of the threads gets unlocked.
You can also consider this as a SizedQueue with default size 0.
Let’s first load the library.
require 'monitor' |
|
|
|
class Rendezvous |
|
include MonitorMixin |
|
def initialize |
|
super |
|
@arrived_cond = new_cond |
|
@removed_cond = new_cond |
|
@box = nil |
|
@arrived = false |
|
end |
There are two condition variables, @arrived_cond and @removed_cond. @box stores the newly arrived messages, and @arrived is a flag to indicate that the new message has arrived. @arrived_cond is a condition variable to notify when a new message has arrived when the send method is called. @removed_cond is a condition variable to notify when a message is removed. This is called when @box receives data.
Let’s look at the send code:
def send(obj) |
|
synchronize do |
|
| ① | while @arrived |
@removed_cond.wait |
|
end |
|
| ② | @arrived = true |
@box = obj |
|
| ③ | @arrived_cond.broadcast |
| ④ | @removed_cond.wait |
end |
|
end |
Here’s the flow of the send method:
- ①
-
Wait until all messages are received. This means that it waits while
@arrivedistrue. - ②
-
Change
@arrivedtotrue, and assignobjto@box. - ③
-
Notify that messages have arrived.
- ④
-
Wait until messages are received.
Can you see how the script flows like this?
The most important point for the monitor and condition variable is at the while loop (we are using while rather than if because we are awaiting multiple conditions using broadcast rather than awaiting a single event with signal). Without the monitor, another thread may change the state of @arrived even when one thread goes through the loop. The monitor and condition variable provide a way to safely acquire the status change.
Let’s now follow the flow of the recv code.
def recv |
|
synchronize do |
|
| ① | until @arrived |
@arrived_cond.wait |
|
end |
|
| ② | @arrived = false |
| ③ | @removed_cond.broadcast |
| ④ | return @box |
end |
|
end |
- ①
-
Wait until all messages are received. This means that it waits until
@arrivedbecomestrue. - ②
-
Change
@arrivedtofalse. - ③
-
Notify that messages have arrived.
- ④
-
Return
@box.
You may think that send becomes activated when notified and changes @box, but it won’t. Another thread won’t change @box when notification is received at (3), because other threads can’t enter into the monitor unless either wait is called or the code completes the synchronize block.
The following is the final version of Rendezvous. We replaced the wait loop with wait_until.
| rendezvous.rb | |
require 'monitor' |
|
class Rendezvous |
|
include MonitorMixin |
|
def initialize |
|
super |
|
@arrived_cond = new_cond |
|
@removed_cond = new_cond |
|
@box = nil |
|
@arrived = false |
|
end |
|
|
|
def send(obj) |
|
synchronize do |
|
@removed_cond.wait_while { @arrived } |
|
@arrived = true |
|
@box = obj |
|
@arrived_cond.broadcast |
|
@removed_cond.wait |
|
end |
|
end |
|
|
|
def recv |
|
synchronize do |
|
@arrived_cond.wait_until { @arrived } |
|
@arrived = false |
|
@removed_cond.broadcast |
|
return @box |
|
end |
|
end |
|
end |
|